Showing posts with label look. Show all posts

Friday, March 26, 2010

Our Blank Wall

We've been staring a blank wall for about a week wondering what we'll do ... 

Yesterday Nolan and I visited the Art Institute - Chicago on Michigan Avenue - it was their weekly Free Evening!  We spent a couple hours exploring the old, the modern, the curious, the new, the unexplainable from 900 BC Asia to 2008 Canada.  

This prompted another conversation about our blank wall. Currently we have our Chicago watercolor hanging amongst the vast emptiness!  It is great but it looks puny in comparison to the wall.  Even though I had thought of an idea before I never shared it with Nolan thinking he'd shoot it down right away.  I kept seeing a trend on design blogs that I like dearly.  

"What do you think of a collage of plates?"  I ask.  He thinks, he nods, then we draw up a diagram of how we might arrange said plates!  This isn't your grandmother's antique plate display!  I was floored that he liked the idea.  It seems like the most economical way to put a piece of art, 3D art in our apartment! Cue Excitement!

Beyond creating something unusual on our wall we also get to hunt for these  said plates at thrift shops, antique stores, garage sales, our parent's homes (just kidding)!  I am really excited about our new design project.

Do you need a visual?  Please see below.

CasaSugar blog offers a 'how to' in case you're wondering if you'd like to accomplish the same look.

For more inspiration and photos - visit these websites!
Remodelista Blog: http://remodelista.com/posts/dining-room-plates-as-decor
Shelter Pop Blog: http://www.shelterpop.com/2010/01/25/inspiration-decorating-with-plates-on-the-wall/
House and Home: http://www.houseandhome.com/design/hanging-plates-wall
Decor It Yourself: http://www.threadbanger.com/decorityourself/post/11062/how-to-hang-a-plate

Monday, December 14, 2009

My Inspiration vs. REALITY

I used Polyvore to create this wedding look half way through the planning process, in May to be exact - 4 months before the wedding.

After reading about a million girls' planning "dos and don'ts" I knew I should create some sort of visual with a combination of wedding elements I'd like to include.  At that point in time some of the elements, like the flower girl dress, were already decided.  The rest of the visual was a combo of all of the ideas, colors, and textures that were floating around in my head.  To a point, this validated my color decision and lingering questions if it was a cohesive look.


Polyvore


So above is the Polyvore look and below is a board made up of photos from the wedding.


Click on the photo to enlarge it.

How do you think I did?

Tuesday, December 8, 2009

We've waited long enough - pro photos

I'd like to share some of my professional photos with you.


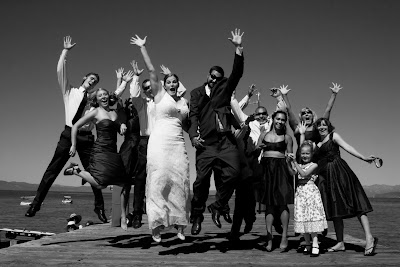
Before we walked down the aisle, we walked down a pier!  We used one of the piers running toward the middle of Lake Tahoe to capture some of our formal photos.  I loved the location, it was just how I wanted to first see Nolan all dressed up.  
Nolan and I did a "first look" (a meeting of the bride and groom before the wedding) and then a little fun photo session with our bridal party. 


me and the man


our bridal party


the men

 
bride and groomsmen

 
the ladies


"how high?"


"Let's go get hitched"

All photos by Michelle Lee

Wednesday, November 25, 2009

when it's all said and done...

I like to think that I created my wedding the best I could - I loved what I did. 
It won't be for everyone but knew I did what I thought Nolan and I would like and we did like it.

But man, it's always the way when you're all finished you end up finding other elements you would have love too!!!

I found this wedding today - if I could have copied a wedding - this would have been it!  I love their style, photography, simplicity, personality, fun!  We actually incorporated many of the same things, maybe that's why I like it!   On top of all the same ideas - she included some of the ideas Nolan and I thought about but just couldn't manage to figure out - like ice cream instead of cake.  I love ice cream!

Check outPeter and Dianna’s backyard wedding on Budget Savvy Wedding - LOVE!


Tuesday, November 3, 2009

Favorites - Homegrown Details.

a FAVORITES series

So among all the great people that helped make the wedding happen, were Nolan's mom and sister. 


I can't say enough about them, as they took on  projects that I wanted to but couldn't because I didn't live in Nevada while planning the wedding.  I envisioned pumpkins, fall flowers, and personal touches that I couldn't accomplish in Chicago. 

I was shy at first to ask... that changed quickly.  Both Susie and Ric take pride in their gardens, they grow divine flowers, fruit, veggies and what-do-you-know - pumpkins!  Nolan's sister, Ric has actually transformed her love of gardening into a profitable business, Chickie Baby Blooms.  So they were eager to pitch in when they could and I am eternally grateful! 

Their decor contributions included orange and white pumpkins (large and small), the bouquet flowers, the ring pillow, and the ring bearers' ties.  Obviously listing them doesn't do them justice as they made our wedding that much more PERFECT! 

Photos above:

TOP: Susie and Camille at Camille's bridal shower in August 2009
BOTTOM: Bryant, Ric, and Ethan at Camille and Nolan's wedding in September 2009

Photos below:
Inspirational photos
TOP: Ties from Bella Bows
BOTTOM: Ring pillow from Martha Stewart online


Susie is a sewing machine so she took on the task of sewing the ring bearers' ties and the ring pillow.  I looked for little boy's ties for a while but came up with zilch.  I did find an Etsy seller, Bella Bows, who inspired me, but her fabric wasn't right, so I took my 40% off coupon to JoAnn's and purchased some fun orange polk-a-dot fabric!  I bought a pattern and gleefully handed it off to Susie.  The ring pillow was a similar story, I didn't find any that suited my taste but soon found this Martha Stewart photo that included hankies and ribbon.  Both my grandmothers and Nolan's had many handkerchiefs, so it was pretty fun to incorporate something old from our families into our vintagey wedding.  Susie sewed it like the ones above, bringing all four corners to the middle, attaching a ribbon and voila - a ring pillow!  It was so special to have our something blue as the handkerchief from my Dad's mom, to top it off, I was delighted even more when Susie sewed on one of her mother's circular doilies on the bottom. 

After I handed off projects to them, I knew I didn't have to think about or worry about them again.  Having supportive, creative, helpful people around while planning a wedding is priceless

The ties were so fun and the ring pillow was just amazing.  Here is a photo of them in action!  (I will have to include a detail shot of the ring pillow, this just doesn't do it justice.)

Nick - Ring Bear


By the time the wedding rolled around, the end of flower season approached.  We were hoping that some of the fun teddy bear sunflowers would stick around but our wedding was a week too late for a lot of the flowers.

Not to fear, Ric was able to pull together 6 bouquets worth of flowers and brought them up to our Tahoe vacation home the day before the wedding and we assembled our bouquets!  That was a bonding experience that I am so glad I incorporated.  All the girls were able to meet if they hadn't and get their creative juices flowing.  They all made their own bouquet and Ric tied them up! 

All the girls choosing flowers.


Contemplating color

Ric tying up the bouquets

 My bouquet in action!

Below are the pumpkins in action as centerpieces!


I am so thankful that we had all of these pieces in our wedding.  It made my day to know that our  grandmothers were present and that our homegrown elements brightened up the day!

Monday, October 19, 2009

Favorites - guest book

a FAVORITES series

I changed my mind a thousand times for what to do for our guest book - so I included 2!

I didn't want a book that kept the names of our guests locked away. It seemed silly to have another book on our shelf that listed our guests in a boring way. There were thoughts of a paint by number painting, frames to sign, photos to take and then sign, small cards to fill out, the list goes on for days...

All I knew is that I wanted something creative (big surprise, I know!).

As I read and reread blogs I came across this photo and a quick explination of the idea. For the life of me I can't remember where I found this - I just saved the photo in my "wedding folder" - (don't judge, you know you have one!).

Thumb Print Wedding Tree

Well it completely fit our "family tree" theme - all I had to do was ask the hubby to see if he liked it in the way I liked it! " I love it!" rang from his mouth and I was filled with glee!

So I purchased all the materials -
1 large, thick, poster size paper - $3 at the local art store
1 poster tube - $4 at the local art store (needed to store and transport!)
3 stamp pads in different greens - $3 each at the local stamp store (same place I ordered my custom stamp!)
3 thin Sharpies - $4 at Target
1 box of wipes - Free from my Dad's house!
Paper to test their thumb prints - Free from my mounds of extra paper! (make it the same weight and texture as the tree poster!)

Grand Total of $ 20!

My bridesmaid/roommate created the tree with her pastels and toted it to Reno for us! She is amazing! Thanks Jack!

I posted a sign displayed at the guest book table with instructions. The tree was pinned to a cork board and the guests happily marked the tree!


It will soon by framed and hung in our home! I can't wait!

I am thrilled that our wedding guests will hang on our wall everyday rather than in a book on a shelf somewhere.

I have to admit, not all our guests made their mark - bummer, I know, but you can't drag your guests to do things they are unaware of. This is where your DJ should come into play. Have a few printed instructions to announce throughout the night! You can't assume everyone will know what's going on, especially if it's out of the ordinary!

Before the tree came into my life, I had chosen an alternate guest book.

From the start I knew I'd like something creative and interactive. So I purchase a photo album and inserted cards into the slots. The cards had instructions on them and a place for the guest to write or draw out the prompt.

In so many words, some of the prompts included, "Write a haiku," "Give marriage advice," "Describe love in 6 words," "Describe family in 6 words," "Draw your favorite memory of Camille or Nolan," "Draw the meaning of love," "Predict where Nolan and Camille will be in 5 and 10 years," "Sign our guest book." The last one was for all those people who wouldn't want to play along.

Because I had purchased the album already ($35) and printed the cards ($5 for the pack of paper) I put it together and used it also. I included not only the cards I printed but the RSVPs we received! It was a fun way for everyone to see what other people did. The empty spaces will eventually house some wedding photos to complete the book.

Some people did both, the thumb print and write something, but the majority just did the thumb print. My mom actually said some people were confused by the book. I guess I needed better posted instructions? A good thing: The book will serve double duty as our Chicago Celebration guest book!

Tuesday, September 8, 2009

Button Bouts!

This Labor Day weekend, in fact most weekends this year I've occupied most of my time with wedding related projects! Yesterday I officially checked off boutonnieres!!!!

I wasn't sure how to start, but I think they turned out pretty fine! I bought many supplies... too many really! They might show up on the FOR SALE label soon! But it was fun to experiment and watch them evolved after 9 were made!

I chose to make them so it would be one less thing to worry about when we're in Reno the week before the wedding. We aren't hiring a florist - as much as I love flowers, I can't find a good enough reason to hire one to create the few flower items we're having. Ric, Nolan's sis is growing flowers to use for our bouquets, she owns Chickie Baby Bloom, fresh cut flowers and produce, operating out of Fallon, Nevada. Center pieces will include pumpkins and potted flowers. They'll be truly homemade and I can't wait to see them.

So the bouts...
Nolan and I walked through a few antique shops and thrift stores on Friday to find a few items for the wedding and I got to thinking about the boutonnieres. What if, instead of silk flowers, they had buttons? About 5 weeks ago I had attempted this project and came up with...

The first version


It was an attempt to look like the one from this post.

I couldn't quite recreate it, that one was full of whimsy and romance, this one looks harsh and NOT RIGHT...

So, I did my own thing. I picked up some really awesome buttons from an antique shop, floral wire, floral tape, ribbon, brown tool, and pheasant feathers from Joann's and we were in business!
My purchases:


9
of them took me the end of Win a Date with Tad Hamilton, watching/playing 3 hours of Wii Mini Golf with Nolan, and another hour of TV, there might have been a BBQ break in there to celebrate the holiday!

Voila! May I introduce our button bouts!


The bout against Nolan's suit


Each one has a different combination of buttons, leafs, feathers, tool; they all include the same ribbon around the stem and plaid decorative ribbon. I can't wait to see them on the men. Now just how do I transport them to Reno?

They'll be complementing these ties:

Monday, July 27, 2009

DIY overload

So, I am in the thick of it.

I am in the middle of:
Invitations that include
- Formal Invite
- RSVP post card
- Decorative thread to combine the pieces
- Travel Guide
- Directions
- Rehearsal Invite if appropriate

Programs

haven't started producing them, but designing them is taking forever! Ahh

Thank You Cards
Designing these too! Ahh! I want them done by my shower, so I can send them out in the following weeks! Eeek!

Guest Book Inserts

Our guest book is a photo album with room for personalized notes, poems, haikus, etc!

All this stationary is by yours truly and it's making me feel like a CRAZY PERSON!


Anyway, I apologize for the nuttiness, I just needed to express my anxiety about all of this happening at once! Advice: If you can spread out the insanity, DO IT!

Also, visit: www.Wordle.net. I am trying to use this concept for our programs, our vows will be copied and pasted into the design!


Check ours out with the small portion of my vows I've written!


Wordle: VOWS">


I love it! Yeah!

Monday, July 20, 2009

Wedding Style

I really want a relaxed wedding. I envision somewhere comfortable, where the kids would be encouraged to kick off their shoes, play and dance. (Something I hoped for the adults to do also!)

I am finding that my relaxed wedding has a ton of moving parts still and it's crazy trying to align them! To help wrangle in the creature known as a TO DO LIST, I've created a checklist with most "due dates" around our paydays! Besides keeping us on track, this has helped tremendously with our budget as well! I haven't felt like we are broke due to the wedding which is nice and it will be even more pleasant after September when we're not throwing money toward the wedding!

Back to the topic - style. I wanted a casual affair; an outside event with friends and family mingling and laughing! I get goosebumps thinking about it. Yet, it was still hard to envision a day wedding and reception. (Do many people get down and dance at a day wedding?- something to discuss in another post.) For me a day affair just yelled casual and it was the only way we were going to make our park wedding work due to the park's hours, closing at sun down and all. I want it to look chic and fun, I don't want it look second hand bought... even though some of it is!

So with our venue booked, we started to make our wedding puzzle pieces fit. I chose the bridesmaids’ dress color almost immediately - brown. I love the chic fall colors and knew that it would be easy to build upon. Everything seems to take on a life of its own when you’re building a wedding style. As you introduce other people into the mix they help you out so much but slowly it starts to become their style too, which I love. A wedding should be a family and friend affair, after all they reflect who you and your man are! I wanted the style of my girls to stand out, they should feel as good as me on that day, therefore they chose their own style in brown silk taffeta.

So with the brown dresses decided upon I began making other decisions.
I chose ties.
All different, but all the colors of our wedding! I am really excited to see them on.

I bought linen napkins for the table decor.
All 180 are one of 30 colors and patterns. I found many at World Market and Crate and Barrel, all on sale and most I convinced the managers to give me a discount because I was helping to clear out their sale section which had napkins that most wouldn't buy because they weren't part of a set. This along with the pumpkins will be our punches of color among the ivory tablecloths and ivory umbrellas.

I am giving my girls the option to choose their own accessories. I gave them each a fall color to use for their accessories. Slowly I am seeing my vision come to life. Jackie bought her shoes this weekend, a pair of fall yellow pumps that are fantastic. Rachel O. has talked about an orange flower for her dress and Kerrie a red wooden necklace. All of these things are getting me a little giddy!


So with all these parts that are within a general theme but aren't alike, do you think it will come together and look okay? I have to admit, I am a little nervous.

As I ask this question I am planning on making boutonnieres. And as I thought I'd do with all the other items, originally they were going to be different, and now I think I am pulling in the creative reins to keep them the same. Here is a photo of what I hope to achieve!

Friday, May 1, 2009

A Semi-Complete Wedding Look


I used Polyvore to create this wedding look.

It took me a few days but I found the items I wanted in the colors that were right. This mock up makes me smile simply because I can see some of my already chosen items with some of my not-yet complete vision coming to life. I am not positive all of the creations here will be at the wedding but it's a good starting point to see if they complement each other...